FREE STANDARD SHIPPING UK ON ORDERS OVER £40


Part 1 - Introduction To Speed Painting Flames Of War T34/85
(This article combines all the project parts from my previous blog into one post you can follow)
It’s all go here at the moment. I am a proud member of Penarth & District Wargames Society. I run the websites and online marketing for the club and our showpiece – Crusade Wargames Show. A big part of Crusade Wargames Show, and the most popular, will be the Bring & Buy stall. A chance to pick up a bargain, or earn a little dosh by selling off figures we all have accumulated.
Why Do A Speed Painting Article For Flames Of War?Well, I have decided to be completely ruthless this year which means ditching a load of nearly new Flames Of war kit. But when I saw the 6 x T34-85 tanks I had stuck together and undercoated I had a thought. Why not get them painted up to sell at Crusade. That was on 7th January 2013. So 2 weeks to get them done! And why not make them the first project for my new website and blog.
I want to do this for 3 reasons:
1. I am not the fastest painter always. I am much better so I wanted to challenge myself. They are not the most complicated to do colour scheme wise either.
2. Because they are simpler I thought they would make a great case study for you all as well. I will be trying to prove that you can paint fast and still have great looking wargames figures and models on the table as well. But quicker
3. Finally well painted figures get more money. Hey, that’s what the Bring & Buy is about, and FOW stuff always goes well. But, it hopefully can act as inspiration for you to. Dig out those old unpainted figures you want to sell and set yourself a target to get them done by the next show or by your birthday or some good target. You can make some nice money selling them then.
How This FOW Speed Paint Will Pan Out?~}Now you might think 2 weeks is not really speed painting. But I won’t be doing these T34’s all in one session. I can’t paint all evening. I have a busy life. A full time job and 2 kids does that for you plus a wargaming club to enjoy and a business on the side. But I am going to do it in focused sessions of 1 or 2 hours at a time every few days. I will be recording the total time it takes to do the steps. Hopefully when you see the total time you can see how easy this is if you have more sessions available to you
Each step will be recorded for you in pictures and the timings shown. I will pop any handy tips in their as well as things I have learnt on the way.
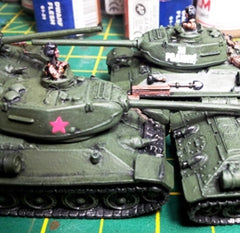
Obviously I want it to look something like the one’s from the official Flames Of War website like the one below.
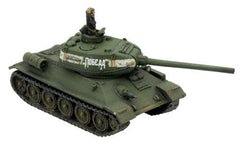
From www.flamesofwar.com website
That’s the easy part. At the moment I have this blog and hopefully a Facebook page real soon. But the easiest way is to get my RSS feed or better sign up below for regular updates. I don’t sell anything in it and it’s the quickest way to get updated when I post new stuff.
Of course it would be nice if you wanted to like my Facebook page here or just share this post so more people can benefit. It’s here for your benefit and study. I want you to come with me on this journey.
Useful Reference Links: (They open in a new tab)
Flames Of War Website – Click hereWarpaint Figures Facebook Page – Like here
Part 2 - Flames Of War Speed Painting For Crusade 2013 – Prep & Base ColoursSo welcome back to the second part of this simple Flames Of War painting series for T34/85 tanks. Today I’m going to get down to some painting. I’m not going to start yapping about brushes, etc in these articles unless relevant, but stick to the painting. Okay let’s go while the house is nice and quiet and the kids are in bed.
I am a bit ahead of myself here. These tanks have been assembled for some time and black undercoated. Typical wargamer with more unpainted than painted.
I will say one thing here and that is how I actually put them together. Obviously I clean off the mould lines and any vent metal or flash. [I will go into a lot more detail for you soon on that. In fact, just going sideways for a moment, I am planning a series of posts getting up close with the basics]. So if you want to find out properly then sign up for my updates at the bottom of this or any post.
Most people when they put these together would use either superglue or something like Evostick. I have found these to be unreliable though. Superglue in particular just can’t take the knocks. especially when you use it on very smooth surfaces, like resin, it ‘shears’ and the pieces fall apart. Not good in the middle of a bocage game to have your tracks coming off your Shermans. So personally I use and recommend Araldite Rapid
As you can see I have undercoated the T34’s black. For this I used a Halfords spray paint Matt Black. My stock undercoater which I buy 2 to 3 at a time so always have some handy if we happen to get a nice day here in Wales. I use a little home made turntable. I made it from an old nappy box and toilet/kitchen roll cardboard tubes. not everything has to cost money.

Company Of FOW T34/85 undercoated black
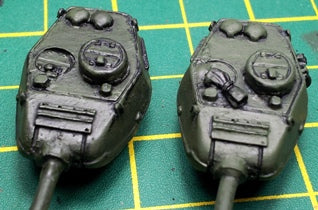
But, what you will get with a model like this is gaps in the spray. It happens naturally as you just cant get the angle on some nooks and crannies, or the dtail is too deep to do. So this is the first thing we have to deal with before we can start painting proper. I have highlighted some of the areas where you need to look carefully.

Looking at the gaps in the T34 undecoat in the track area
Let it dry properly before you go on.
Time Taken – 20 minutes
Time To Go Green ComradeRight now we can add some colour at last. But first, let me tal about what technique we are going to be using here. Now I could be quite intricate and start applying the base colour and gradually building up the highlights..no. This is all about getting it done fast and having some cool looking tanks that your friend will look at and say, wow those are really nicely painted. then you can tell them it only took a few hours to paint and watch the envy.
The method we are going to use is block out black line. Yep I just made that up as I couldn’t think of anything better off the cuff (If you can think of a better name,,, it won’t be difficult, let me know in the comments below)
The paint I will be using is Vallejo Russian Green and a wet pallette, to keep it workable longer. Add a little water if its too thick or it will dry too quick and your coverage will drop quite drastically
[QUICK TIP 1]: Always shake Vallejo paints well before using and then roll like a sausage in between your hands because they settle quickly and seperate out into watery carrier and pigment.
 Now starting with the larger areas and panels, fairly quickly apply the colour. It doesn’t matter if if goes on the tracks and other items a little as you can re-undercoat them by hand later. Now what you need to do is leave a thin black line of unpainted undercoat around areas such as bolts, panels, between panels, around the hatches, etc. This is your ready made shadow. Don’t worry too much if its a little untidy as the later stages will fix this. The main thing to be aware of is that you don’t apply it too heavily to any area that’s supposed to be a grill.
[QUICK TIP 2]: Wash your brush out regularly. The paint will dry quite quickly and you have a lot of surface area to do. You will completely destroy your brush and make how smoothly the paint goes on harder unless you do.
The Results Of This Session
You can see in the photos below how its coming together. It looks a little rough now but it’s the finished T34’s we’re interested in. You don’t have to do this in one sitting either. It’s easy o pick up. In fact I took two sessions with my limited time at the moment.
Of course at this stage they don’t look the business. In fact they look a bit horrible. But its the long game you’re working on so stick with it and you will be amazed how you can transform them


Time Taken – 1hr 30mins
Total Time So Far – 1hr 50 mins
(This is probably one of the longest sessions in my opinion)
Next Time…Washing Out Your Rough Edges
Part 3 - Flames Of War Speed Painting For Crusade 2013 – Smoothing Your Edges
Last time in the second part of this series for painting Flames Of War T34/85’s fast, I showed you how to do some final preparation and block out the first colours. Now as I said, when you look at the pictures it looks very rough.
So how are we going to fix that and make these Flames of War tanks real pop?
Blacking Up Your Rough Edges
What I want is a simple technique to smooth everything out and add some depth. We want all that blockiness and black outlines smoothed out. Ink is our friend. In this case it’s black ink. Which on isn’t really that vital. Most inks are pretty good. I used to use a Windsor and Newton Indian Ink. That’s all gone so I have a Games Workshop Badab Black
You Need An Ink Wash Not A GlazeThe trick is to get the watering down right. There is a difference between an ink wash and a glaze. A glaze is very thinned down to almost clear water. Usually applied last it really binds blended or layered layers together superbly.
But a wash is nowhere near as dilute. It is supposed to flow with the pigment settling in recesses to give or deepen shadows. I want it slightly more concentrated than a wash. The object is to get something that does the same job as a wash but also deepens the green already on.
My Ink recipe For The T34’s I will be using one of my older brushes (I am a bit of a hoarder with brushes. You never know when an old scruffy one is ideal). Ratio of ink to water is going to be 1:2. This applies whatever object, pipette or anything else you are using to get the ink and water onto the palette. As it’s an old one I’m using the actual brush to get the ink out and dilute it.
Using Your Ink Wash On The Models
 Don’t be afraid to be bold and brazen with this. Dive your brush in and slap it on. You want plenty of ink wash on the brush. Let it flow and hang around in those shadows and recesses. Of course I don’t want huge pools of ink. If this happens just dab it up slightly with the corner of a paper towel
Keep going until all the tank bodies are done. You will be able to see the difference immediately
[At this point I have to apologise for the state of the palette I’m using. My beautifully clean one has been swiped by my daughter and is at the moment sitting on the kitchen side, wrapped in cling film with PVA glue in it. So I get her dirty one she didn’t want to clean. Kids eh.]
 [Quick Tip 1]:
The biggest problem is where to hold the models so your  fingers don’t draw of the ink applied (Capillary action you know – technical stuff alert). So think where you are going to hold them. I like to use the corners of the tracks.
For the turrets, hold the barrels and do up to your fingers. Let it dry enough to pick up by the turret fitting on the bottom that you won’t see and finish the barrel off
I am quite pleased with these. They are quite a bit darker and the ink does make them go shiny. But that’s not a problem. We will solve that in the next stage. But, you can see that a lot of the roughness has gone. This will be even clearer when we go through the next stage.
You must let them dry completely. If you don’t then when you try to put any colour on the ink will leach into it and make a right old mess. Leave them overnight
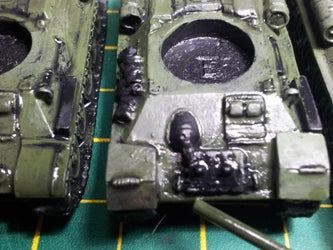
Can you Spot The Deliberate Mistake Now
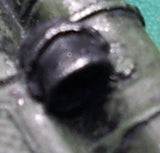
 So I hold my hands up. I have got to stage 3, been photographing and didn’t notice. Can you see what I have done? Yep, I have completely missed the bow machine gun fitting!
Thankfully something like this is easily fixed. Once the ink is dry I can pop on the base coat and ink wash it. You won’t even know about my mistake (Hangs head in shame)
Total Time So Far – 2hr 10 minutes (2 sessions)
Next Time…More Green Please Mr Stalin!
Part 4 - Flames Of War Speed Painting For Crusade 2013 – More Green Sir!
So it’s 23rd January 2013 and my God! Crusade is rapidly approaching. In fact that’s quite scary. Only 3 days away. There are about 3-5 stages left of this FOW painting guide left. They vary in length and complication. So it’s time to focus hard.
Yes We Need More Green Paint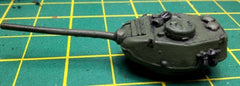 By now you should have how ever many tanks (In my case 6). All nice and dark green and shiny. So reach for that Russian Green Vallejo paint again. Stalin always demands more green for the Motherland. Seriously though you now need to restore the original shade of green. I can hear the groans. Well we could have not done the ink, but it’s so important for adding depth and smoothing out any faults.
Now you might well have heard of dry brushing. In that case you take your highlight colour and remove almost every last bit of paint from the brush and you are just left with the pigment. This gets brushed over the model catching on the detail and highlighting it. It is effective, but wrecks brushes. That’s the simple version.
But we don’t want that. Why? Well for a start dry brushing should be subtle. Use it too early and it looks messy, contrasts too much so the highlight is harsh not subtle and can actual look dusty. But here it is worse. The ink has made the tanks shiny. Dry brushing just won’t look right and you will probably get brush streaks as it “slips” all over the model.
So I am going to use ‘wet brushing’. The paint is thinned down again first and a little is taken onto the brush. All we do now is slightly wipe off the excess on a paper towel. There is not as much paint as when you first dipped it, but there is too much for dry brushing.
[QUICK TIP # 3]: A bit of advice if you are unsure. Find an old model you can practice on. Keep practicing until you feel more comfortable. Then just do one tank at a time and see where you are.
[QUICK TIP # 4]: Use an older brush. It’s not as hard on brushes as dry-brushing, but not far off. Even though it is older it should still be able to hold its bristle positions quite well without unnecessary splaying
 Basically I see this as a fast way to restore the colour. We can be quite quick with this method as well. As we are not loading our brushes they can almost be dragged across detail, leaving the paint.
So you don’t have to worry about shaky hands so much around the details. The paint will be left high on these, but also be wet enough to provide coverage on the larger flat areas. To get the paint consistency right takes a bit of experiment. I found that about 3 or 4 parts water to paint works about right.
 Okay so I whizzed through those quite well in about 40 minutes. That’s not too bad as I was fighting the cat half way through. He is stubborn and won’t take no for an answer when he is try to jump of your lap. Very sharp claws as well. Its not good jumping in the air in pain as he drags himself up my jeans, when you’re trying to concentrate.
But I got it done and the pictures are below. You can also see in the early pictures I did some comparisons with the ink washed ones.
[QUICK TIP 5}: Strangle the Cat! No sorry joking. The real point is to take frequent breaks. Please do. I suffer as a result of not doing this earlier in my painting life and that why I wear glasses now and get neck ache easily. Being tall makes it worse (I am 6’7”!). Get up and take a walk. Get the blood flowing, go outside for some air and stretch out those muscles and move that neck. For your eyes practice regularly look at your hand and then quickly trying to re-focus on a far away object
Total Time Taken – 2hr 50 minutes (3 sessions)
Next Time…Grinding out the penultimate day
Part 5 - Flames Of War Speed Painting For Crusade 2013 – Dry Brushing
Well it’s Thursday 24th January 2013 and Crusade is looming large. I am going to have to go some now to get these Flames Of War Russians finished in time and to a good standard. I think that I am helped by the fact that the longest stages are pretty much out of the way now. So breathe a nice sigh and chill.
It’s time to start what will be the beginning of the finishing touches. The home stretch is in sight. So the next thing I am going to do is add some highlights. I am going to do this with a quick and easy technique called Dry Brushing.
How it works is that we are going to put some paint on the brush and take it all off again. You what? That’s right, that’s the principal of this technique. With all the paint removed (Or as good as), all that will be left is dryish pigment. When you lightly drag this over the T34/85 the pigment will be scraped off by the high points and edges of the model leaving these highlighted
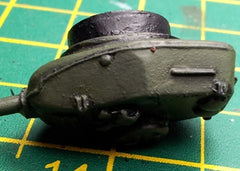
[QUICK TIP # 6]: Dry brushing kills brushes, quickly. Do not use your best Kolinsky Sable expensive brush. Use an old brush where the bristles are just about beginning to curl. Or a new cheaper sable brush that is wide, flat and square ended. You can see the one I use on the left here.
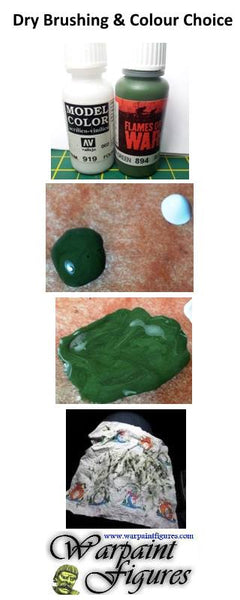
Well obviously it needs to be a lighter shade of the green we have already been using the Vallejo Russian Green. The choice though is whether we lighten with yellow or white both of which have there merits.
They also have two very different effects. Now if I was painting a goblin for instance it wouldn’t matter so much as long as I painted all of them the same. It would just be a matter of personal taste. That’s because trying to make green lighter with yellow actually starts to produce a different shade of green. With yellow it will actually start to edge towards a grassy or lime green. Whilst light enough to produce a highlight it’s just wrong for the real life tank here.
So I am going to use a little white. I put blobs of both on the palette, watering bothdown slightly. I don’t want the drybrush mix too liquid or it won’t work at all. Gradually take a little white and mix it thoroughly into the green until you get the shade you want.
Now you don’t want a massive difference at this stage. It should be quite a gradual or subtle transition. I tend to use the butt end of my brush. A bad habit but a common one. You use whatever you want as long as it’s clean. In fact it took 2 small butt ends of white to get me the shade I wanted. It doesn’t look much different on the palette but as soon as you start dry brushing it works lovely.
Just a note on drybrushing. Always have a cloth or kitchen towel hand on your desk to get that paint off with before drybrushing. I used kitchen towel with a rather fetching Christmas motif! I had a double layer and laid it over my thigh. I don’t necessary advise this as. I don’t want any nasty emails from parents or other halves saying how I ruined a best pair of trousers! I recommend using your painting desk/area if you can. Another good technique is to swipe the brush a couple of times and then fold the kitchen paper over with the brush inside. Then pull it out squeezing the bristle to help remove more.
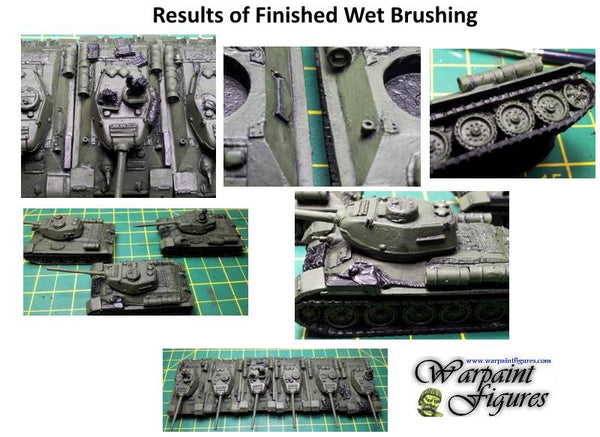
The Finished Dry Brushing StageI am quite pleased with this. Now if I wanted to I could add a second slightly lighter highlight. It’s personal taste really. If you want something with a lot more contrast then go for it just adding a little more white each time. But know when to stop.

Total Time Taken – 2 hous 10 mins
Part 6 - Speed Painting FOW T34/85 Company For Crusade 2013-Track It Black
Well it’s still the 24th of Jan and it’s going well so I have decided to push on tonight. The wife and kids are asleep and the house is nice and quiet so it’s perfect. Even the cat has given up trying to bounce me as usual.
So in the last stage we took care of the first highlights proper with some dry brushing. Now there was a reason we did that before any other stage that left. It’s messy and can easily accidently be brushed over any painted detail. So I would rather get it out of the way. Mistakes are then easier to correct by doing this stage of blacking up again.

You might think that again this seems a bit pointless to basically undercoat again something we have already done. Well take a closer look. You can see that there are traces of green paint over things like buckets, stowage and tracks. The picture below clearly shows that. You can see the green paint inside the lip of the track. That all has to be re-blacked.
It is much easier to get a more even colour on the stowage and tracks if we first get it back to scratch to apply the new base colour. Dry brushed metal over green doesn’t work for me I’m afraid.
Get your black paint. Again it doesn’t matter which as long as the finish is matt. Then you are going to thin it down.
This is almost identical to the first preparation stage when we were clearing up missed areas. I am watering down so that I get a good flowing paint mix.
I want to be able to go around painted edges neatly without accidents. So a good brush and flowing paint is ideal
Stuff you are looking to get done:
 Obviously you need to go on what is on your model
Tracks can be particularly tricky if the paint doesn’t flow. The sculpted detail is small and if the paint doesn’t flow into these you can be left with white or bare patches
So work through smoothly and be careful around things like the running gear. The pictures below show the finished article ready for the next stage. This stage does take a little while to do properly.

Time Taken – 30 minute
Its time to get the metal dry brushing out of the way. Silver and metal colours are some of the most destructive colours to get off or re-paint on previously painted light colours. So get it done now whilst still time to rescue.
 I am going to use Wargames Foundry 104A Gunmetal Shade. I am not a fan of all the Foundry paints but this one is one of the better ones. So as before get some onto you palette and water down slightly. Now dip and remove the paint as before. Try and use a fairly small brush if possible to be more accurate.
Whatever you do you will find that when you do dry brush with metallic’s a small dust like residue does flick over some of the model, so just give it all a quick blow to clean it off.
 So lets get started and do all the tracks first. A bit tedious but get that out of the way and it makes it easier to get to the end. Then go around and do any other metal like buckets, spare bits of track and links for rope
Time Taken – 15 minutes
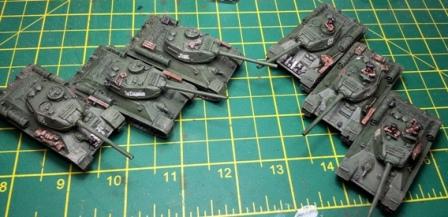
The T34’s are really coming together now. They are looking the part, especially now the highlights for the green and the tracks are done.


Total Time For This Stage – 45 mintes
Total time to date – 3 hours 55 minutes
Part 7 - Speed Painting FOW T34/85 Company For Crusade 2013 – Stowage Session
Well here we are on the last evening before my crusade deadline. So far I have taken 3 hours and 55 minutes to get to this stage of painting these FOW t34’s. Am I pleased? Well yes actually. The object was to get some good looking and painted tanks, effectively to the gaming table as quick as possible. So far so good.
Now the painting isn’t the best I could have done. But this wasn’t the object. It was to prove to myself and any of you who read this what you can achieve with small sessions of focus. So onwards then!
So it’s those fiddly bits that tend to annoy next. They don’t seem much all the chest, canvas sheets, sandbags and bits of stowage. But if you let them get on top of you they can be a long winded pain.
But, don’t ignore them. Often it’s the little details that really make a model special or stick out on the table. It makes it shall we say, human? So the technique is to get them done fast but well. A simple 2/3 layer technique should do it
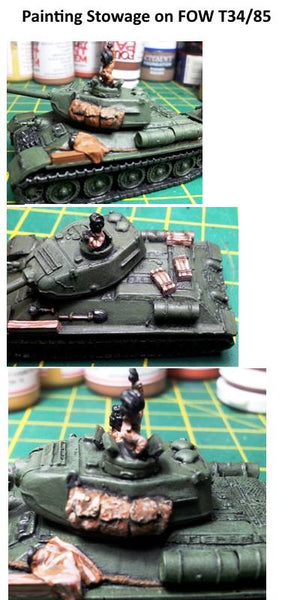 Okay, for the base colour I am going to use a simple GW Bestial Brown. Any mid-brown should do it though, something like Foundry Spearshaft brown should do. As usual dilute it slightly. Use a good brush and apply in a block carefully. We don’t want to get any on the layered and dry brushed body. I have done that in the past and you have to go back and re-do the layers. Not fun
When you do the wooden boxes try to avoid painting the straps across the top. I have left them black as this will make it easier to do the metal quickly later. Otherwise you have to re-black them later.
First highlight is in fact Wargames Foundry Base Sand A Shade. That’s watered down and is just about right, without being harsh. Finally I use the same paint but a C highlight. It looks a bit harsh at first. But I think once the weathering and matt varnish is on it will be fine on the table. In fact you do have to be a bit more contrast to pop the models from eye distance when gaming a lot of the time.
Of course after you have done this, then paint those straps with Foundry Gunmetal Shade A. That also applies to the spades, saw blades and other small metal bits.
For the ropes I tend to leave out the last highlight. I don’t want everything to look the same.
Time Taken – 20 minutes
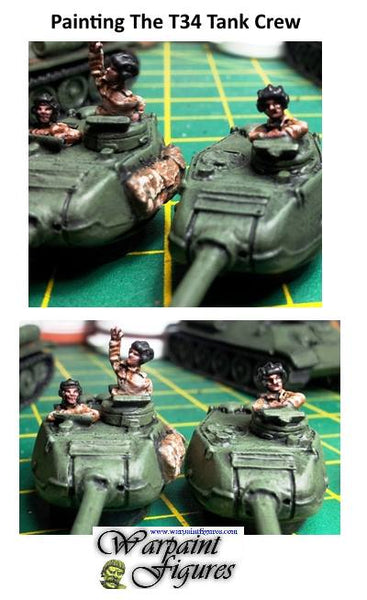
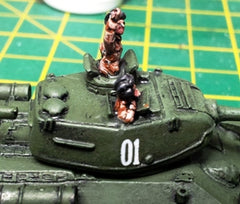
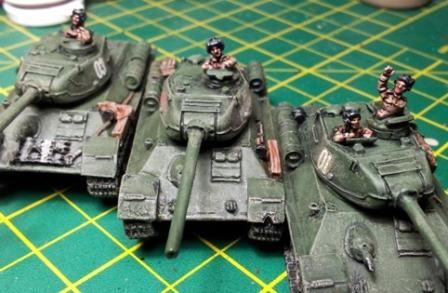
The crew again should be nice and fast and easy. I am aiming for an overall effect. The Flames Of War figures actually don’t have a lot of definite detail. I have seen other 15mm figures much better. But that’s not what they’re designed for.
So a base of Bestial Brown to the uniform, followed by the same highlights we used for the wood. For the black tanker caps I highlighted with Foundry Charcoal Black B. Again it was quick and easy
So next I go for the flesh. You can see the paints I used here. I went for a GW Dark Flesh base. Next a simple highlight ofGW Dwarf Flesh on the higher points that are modelled. Again quick, simple and effective. If you want you can add another highlight or even a brown ink wash if you want something extra.
Time Taken – 20 Minutes
Right, that wasn’t too bad. I am very hopeful of finishing on time now without burning the midnight oil too much. It’s 10.30pm and if I can take a break now I can probably get them done by midnight, have a beer and get some rest before Crusade tomorrow. I know I’m going to be on my feet for 12 hours or so and shifting trader’s kit.

Total Time For Session – 40 minutes
Total Time So Far – 4 hours 35 minutes
Part 8 -Speed Painting FOW T34/85 Company For Crusade 2013 – Bringing It Home
Back fully refreshed and caffeinated up for the final stretch of painting FOW Russian t34’s. I am going to leave everything in one post so it could be quite epic! So what’s left?:
[QUICK TIP # 6]: If you are going to be weathering something like a tank you need to make sure you add any decals or insignia BEFORE you weather them. It looks a bit silly if your tank is beautifully weathered or dirty and then smack on top is a sparkling platoon number or slogan.
If you have never used these before then these little slides can be a right fiddle or even a nightmare. For me the first time I ever used them, back in the days of my first Airfix Spitfire (“cough” years ago) I made a pig’s ear of them. They can curl around brushes, break apart if rough handled or shift at the last minute and end up twisted around. Four big things here:
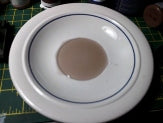 First of all get yourself a pair of scissors, a saucer with a little water (coloured), kitchen towel, a scalpel and a largish fairly wide brush. You will see why I use coloured water in a few moments.
Next pick which transfers you want from the sheet. The white ones can be difficult to see so you may have to hold then up against the light. Carefully cut out a pair of the decals. I really recommend doing them in pairs. If you mess one up then you have a spare ready to go straight away.
![]() So take the pair of decals and gently drop them into the water in the saucer. Face up is the best I find. That way well the paper backing gets wet enough and the transfers float away they are the right way up. Now I hope at this stage you can see the point of the coloured water. White transfers in clear water in a white saucer are a pain to try and find. Of course you could always use a coloured saucer if you have one.
So take the pair of decals and gently drop them into the water in the saucer. Face up is the best I find. That way well the paper backing gets wet enough and the transfers float away they are the right way up. Now I hope at this stage you can see the point of the coloured water. White transfers in clear water in a white saucer are a pain to try and find. Of course you could always use a coloured saucer if you have one.
After a while you’ll notice that the backing paper gets soaked through and they start to curl. At this stage take the scalpel and brush and gently push the little pair of transfers and push them under the water completely. Then all you have to do is wait. I tend to test about every 5-10 mins. by gently trying to see if the transfers move away from the backing, with the tip of a scalpel. Don’t try and force them. Have patience
 The technique I use is pretty straight forward. That and a big slice of luck (Just joking). Placing the brush or other flat tool in the water I gently push the decal onto the brush with the tip of a scalpel blade.
Carefully place the brush and the decal, which should be ‘floating’ on a layer of water right up to where you want it. Now there are 2 things I can do depending on its size and how it’s sitting on the brush:
3. Now that should get it onto roughly where you need it. Now it’s still floating on water so now is your chance to adjust it into position. I use the very point of my scalpel.
 When it’s in place use the kitchen towel and place the very edge next to the decal. This will pull out the excess water from under it. You can then use the kitchen towel pressing directly down on the decal which will force out the rest of the water. hey presto. It does require a bit of practice. But once you get it the most difficult bit is getting it on the brush I the first place
Time Taken – 15 minutes (Excluding soaking time)
Weathering Your T34’s
So now I’m at a point where basically they are painted. Yeah! but wait a minute. I could field or sell them as is. But, they do look a bit ‘factory fresh’. Not a look of a tank that’s been fighting in the field, driving the Fascists vipers back to their holes in Berlin. What we need is a bit of weathering. Nothing too complicated.
Absolutely not. I know plenty of gamers and some club members down Penarth who don’t care. They just want to get them on the table blowing holes out of things. I can’t criticise that. Each to their own as it were. But I like just a little something else. After all if you’re taking the time to make some nice terrain to fight through then why not make them look as though they belong there.
Well how can I put it. It’s easy. This isn’t display standard we’re doing here. So a nice simple carefully applied light brown dry brush should do the job. Not only that, but it will cover a multitude of sins and hide the shininess of the transfers you put on.
For this I’m going ton use a GW Foundation Paint – Khemri Brown. It’s just the right balance when applied between the impression of mud and dust. You could also add a second lighter coat if you wanted as well.
Use the usual dry brush technique but really get rid of virtually everything in the brush. Apply it carefully.
There are certain areas you need to concentrate on to make it go best:
• tracks
• track guards and splash areas
• exhausts
• angles and edges on the bodywork
 This should be quite quick to do. Just remember apply a lot less than you need. You can always go back and add second application.
That’s it now. All the actual painting is done. That feels like a real achievement. I am stoked because it’s before midnight.
Time Taken – 15 minutes
I love gaming, but I think nothing is worse than painting up models for a game only for some one to drop or scrape them accidently. That cold feeling of seeing your hard work come apart is gutting. It’s not the player’s fault, but mine.
I have been guilty of this in the past when rushing to get stuff done. But these days, models never go on the table without a protective coat. I have 2 choices:
Matt Varnish
Very natural looking and realistic. But it is not very tough and doesn’t protect enough, even against sweaty fingers (We all have them)
Gloss Varnish
Can be tough as old boots so it gives good protection. But it is very shiny, unrealistic and sometimes under strong hall lights the shine obscures your work
It’s a personal thing really. A lot of gamers are more than happy with a slap of gloss varnish. But if you’re not and you want natural and protected I use a system that can give both
A coat of gloss varnish followed by a coat of thin matt varnish
Now you have to be careful. If the coats are too thick it fills in the detail and looks pretty awful. I never use spray varnish. I had bad experiences years back. I find they don’t cover that evenly, you can’t control coverage as well, they can foam and pool and generally need daylight, outdoors and no rain. That’s tricky when I paint at night and live in ‘sunny’ Wales.
So I have adapted and now use artists Acrylic Varnishes made by Windsor & Newton and Dahler. I get them from my local Hobbycraft store. They aren’t too expensive and come in a big bottle.
The best thing about them is that they are fluid and quite thin and dilute making them ideal. Also being water soluble they don’t cripple my brushes as quick. They are worth giving a go if you fancy something different.
Time Taken – 30 minutes
Total Time Taken for this Session – 1 hour
At less than 1 hour per tank I am really pleased. It shows what you can do with limited time and just focusing on the simple stages and completing them
Coming soon I will get some proper photographs up in a summary/conclusion post